Showing posts with label BeagleBone. Show all posts

Wednesday, February 28, 2018

Building a Linux Powered Multi-copter from Scratch

Introduction

I purchased my first quadcopter about 6 years ago, back in the heyday of MultiWii. I flew it a few times, crashed it a few times, and it was fun for a little while, but my model lacked GPS, WiFi, and stabilized video, so it ended up sitting on a basement shelf for a few years.

Fast forward to fall 2017, where two things came together. One, I was able to get my hands on an Intel Aero RTF. This is a very powerful computing package on "wings." And two, the Beaglebone Blue came to my attention. It didn't take me long to come up a burning question...."I wonder if I can get the Beaglebone to do most of the stuff the Aero does?"

Let's find out!

Here is my syllabus for the next few blog posts. I'll try to match my normal development progression: get something working and then tweak it for performance.

  1. Component Details
  2. Initial Board Bring-up
  3. Flight Control Software
  4. Ground Tests
  5. Mavlink Improvements
  6. Boot Time Improvements

Stay tuned for Component Details...coming up after a short break.

Howto: Bluetooth GN/NAP on Beaglebone

This is an old article that I never published, but I'm making it available now, "as-is". Some of the instructions may be outdated, but I hope you find it helpful.

Recently I had the need to create a more secure wireless network connection. Bluetooth NAP came up as a viable solution, for a number of reasons:

  • Short Range
  • Fewer Sniffing/Hacking/War-driving tools
  • Mobile device support (Android/IOS)
I'll detail some of the configuration challenges and pairing procedures to get it up and running.

Prerequisites

  • Linux beaglebone 3.8.13-bone50 #1 SMP Tue May 13 13:24:52 UTC 2014 armv7l GNU/Linux
  • Bluetooth USB Dongle: GBU521 (http://www.iogear.com/product/GBU521/)
  • Powered USB Hub (IO Gear Bluetooth adapter will not work when directly plugged into Beaglebone)

Get Bluetooth up and running

Update servers/folders/file names:
sudo apt-get update

Bring installed packages up-to-date:
sudo apt-get upgrade

Install necessary packages:
sudo apt-get install bluez bluez-tools bridge-utils

Ensure Bluetooth is up and running by listing loaded Kernel modules:
debian@beaglebone:~$ lsmod
Module                  Size  Used by
rfcomm                 26769  10
bnep                    8909  2
g_multi                50407  2
libcomposite           15028  1 g_multi
btusb                  10339  0
bluetooth             159258  24 bnep,btusb,rfcomm
rfkill                 16672  2 bluetooth
mt7601Usta            641118  0

Verify Bluetooth Stack

See if device is up via bluez:
debian@beaglebone:~$ hciconfig -a
hci0:   Type: BR/EDR  Bus: USB
        BD Address: 00:02:72:CC:B8:47  ACL MTU: 1021:8  SCO MTU: 64:1
        UP RUNNING PSCAN
        RX bytes:1351 acl:0 sco:0 events:60 errors:0
        TX bytes:1333 acl:0 sco:0 commands:60 errors:0
        Features: 0xbf 0xfe 0xcf 0xfe 0xdb 0xff 0x7b 0x87
        Packet type: DM1 DM3 DM5 DH1 DH3 DH5 HV1 HV2 HV3
        Link policy: RSWITCH SNIFF
        Link mode: SLAVE ACCEPT
        Name: 'beaglebone-0'
        Class: 0x420100
        Service Classes: Networking, Telephony
        Device Class: Computer, Uncategorized
        HCI Version: 4.0 (0x6)  Revision: 0x1000
        LMP Version: 4.0 (0x6)  Subversion: 0x220e
        Manufacturer: Broadcom Corporation (15)


Pair Beaglebone and Device

NOTE: Make sure you have a discoverable Bluetooth device turned on now... 

Test scanning:
debian@beaglebone:~$ hcitool scan
Scanning ...
        60:A4:4C:00:00:00       CGM Nexus 7

Configure local Bluetooth settings:
debian@beaglebone:~$ bluez-test-adapter name honeypot
debian@beaglebone:~$ bluez-test-adapter pairable on
debian@beaglebone:~$ bluez-test-adapter discoverable on
debian@beaglebone:~$ bluez-test-adapter discoverabletimeout 30

NOTE: After setting discoverable to on, you must scan for the beaglebone before the timeout. If you took too long, simple set discoverable to on again.

Pair the beaglebone to the other device
debian@beaglebone:~$ bluez-simple-agent
Agent registered
RequestConfirmation (/org/bluez/15561/hci0/dev_60_A4_4C_B7_C0_A2, 945453)
Confirm passkey (yes/no): yes

Press CTRL-C to quit simple agent....

Add the other device to the trusted list
debian@beaglebone:~$ bluez-test-device trusted 60:A4:4C:B7:C0:A2 yes

At this point the devices are paired, but no services are running on the Beaglebone.

Configure Services

Add NAP service to Beaglebone by editing bluez-nap-server:
debian@beaglebone:~$ sudo nano /usr/local/bin/bluez-nap-server

#!/usr/bin/python

import sys
import time
import dbus
from optparse import OptionParser, make_option

bus = dbus.SystemBus()

manager = dbus.Interface(bus.get_object("org.bluez", "/"), "org.bluez.Manager")

option_list = [
      make_option("-i", "--device", action="store", type="string", dest="dev_id"),
      ]
parser = OptionParser(option_list=option_list)

(options, args) = parser.parse_args()

if options.dev_id:
        adapter_path = manager.FindAdapter(options.dev_id)
else:
        adapter_path = manager.DefaultAdapter()

server = dbus.Interface(bus.get_object("org.bluez", adapter_path), "org.bluez.NetworkServer")

service = "nap"

if (len(args) < 1):
        bridge = "tether"
else:
        bridge = args[0]

server.Register(service, bridge)

print "Server for %s registered for %s" % (service, bridge)

while True:
        time.sleep(1000)

Make it an executable file:
debian@beaglebone:~$ sudo chmod a+x /usr/local/bin/bluez-nap-server

Start it at boot by creating/editing a service file:
debian@beaglebone:~$ sudo nano /etc/systemd/system/bluez-nap.service

[Unit]
Description=Bluetooth NAP Server
After=syslog.target

[Service]
Type=simple
ExecStart=/usr/local/bin/bluez-nap-server br0
WorkingDirectory=/home/debian

[Install]
WantedBy=multi-user.target


Enable the service:
debian@beaglebone:~$ sudo systemctl enable bluez-nap.service

Enable DHCP by modifying udhcpd config file:
debian@beaglebone:~$ sudo nano /etc/udhcpd.conf
start      169.254.7.2
end        169.254.7.2
interface  br0
max_leases 1
option subnet 255.255.255.252

Create Bluetooth Bridge interface (add to end of interface file, after usb0 definition):
debian@beaglebone:~$ sudo nano /etc/network/interfaces
# Bluetooth NAP interface
auto br0
iface br0 inet static
address 169.254.7.1
netmask 255.255.255.0
bridge_ports none
bridge_fd 5
bridge_stp no

Reset and restart services
debian@beaglebone:~$ sudo systemctl restart networking.service
debian@beaglebone:~$ sudo systemctl restart udhcpd.service
debian@beaglebone:~$ sudo systemctl restart bluez-nap.service

References

  • http://notes.pitfall.org/ip-over-bluetooth-to-a-raspberry-pi.html
  • http://www.hkepc.com/forum/viewthread.php?tid=1710030
  • http://forum.doozan.com/read.php?2,2698
  • https://viaforensics.com/articles-presentations/bluetooth-packet-capture-android.html
  • https://bbs.archlinux.org/viewtopic.php?pid=1129449
  • http://www.linux.com/learn/tutorials/346552-personal-area-networking-with-bluetooth
  • https://github.com/Douglas6/pinaple
  • http://www.raspberrypi.org/forums/viewtopic.php?t=36889&p=479992h

Monday, January 19, 2015

Howto: Build Octal Beaglebone Black Cluster

Compiling Qt is getting old. While my applications are not that big, I find myself building Qt from source more often that I would like. I have cross compiled Qt on an x86 Ubuntu machine, but getting the configuration script to properly detect all of the modules is time consuming.

My first idea was to get a few Beaglebones so that I could be building multiple versions at any given time. This worked well, but it still took 20+ hours to get a testable output. If only there was a way to get these Beaglebones to help each other out......ah, but there is!

Enter distcc. Distcc is nice in that it is simply a wrapper around your existing build commands. This means it is easy to setup and use. Distcc works by inserting itself between the make script and the compiler (gcc or g++), which it accomplishes through the standard CC and CXX command line options available through make. By redirecting gcc and g++ commands through distcc, you can get a parallel build across machines using the normal make -j option.

Overview

  • Configure hardware
  • Install image
  • Install packages
  • Configure Main build client
  • Configure compile hosts
  • Run


Hardware

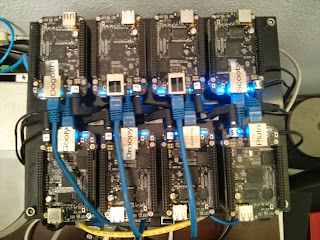
  • 8 Beaglebone Blacks (2 Rev. A6A, 1 Rev. B, 3 Rev. C, 2 Element 14 Rev. C)
  • 16 port Ethernet Switch (N-tron 516TX)
  • 50 Watt 5V DC Power Supply (Omron or Astrodyne)
  • DHCP Server (Asus RT-N56U)
There is nothing special about the hardware. As you can see, I used a wide variety of Beaglebone versions from two suppliers. The support structure is made of 20 mm extruded aluminum and an acrylic sheet:


Software Installation

Use the default operating system image or download a Debian console eMMC flasher such as BBB-eMMC-flasher-debian-7.7-console-armhf-2014-10-29-2gb.img.xz found at the elinux.org site.

Add the required tools:
>sudo apt-get install distcc distcc-pump g++ make


Compile Hosts Configuration

Choose one Beaglebone to set aside as the main build client. Ideally this would be the Beaglebone with the most memory (RAM and filesystem). The other seven "workers" will be referred to as compile hosts. In order to simplify the calling of distcc on the main build client, we need to give our workers hostnames. Run the following three commands on each of them:
> sudo nano /etc/hostname
> sudo nano /etc/hosts
> sudo hostname boris


In the 'hostname' and 'hosts' files, replace the default hostname (usually "beaglebone") with the desired hostname, which in the example above would be "boris".

A reboot will force an update to the hostname, but before we do that, we need to tell distcc to start a service at boot and to allow local network traffic. Edit the first few lines of the /etc/default/distcc config file:
> sudo nano /etc/default/distcc
to look something like this:
# Defaults for distcc initscript
# sourced by /etc/init.d/distcc

#
# should distcc be started on boot?
#
# STARTDISTCC="true"

STARTDISTCC="true"

#
# Which networks/hosts should be allowed to connect to the daemon?
# You can list multiple hosts/networks separated by spaces.
# Networks have to be in CIDR notation, f.e. 192.168.1.0/24
# Hosts are represented by a single IP Adress
#
# ALLOWEDNETS="127.0.0.1"

ALLOWEDNETS="192.168.0.0/24"


Reboot to commit the changes.

Main Build Client Configuration

Like we set up on the workers, we need to give the master a hostname. Two of the commands are identical:
> sudo nano /etc/hostname
> sudo hostname pluto

but we need to add the workers, in addition to the master hostname, to the hosts file:
> sudo nano /etc/hosts

Which, if your master unit is named "pluto", will look something like this:
127.0.0.1       localhost
127.0.1.1       pluto
192.168.0.106    droopy
192.168.0.71     astro
192.168.0.232    dogbert
192.168.0.9      scooby
192.168.0.100    underdog
192.168.0.139    snoopy
192.168.0.180    goofy
192.168.0.41     peabody
192.168.0.20     brian

That's it! We are now ready to run distcc.

Run distcc

Before we run distcc, we need to setup a couple of environment variables.

The first variable is handy if you are having trouble talking to workers, or would like more feedback from distcc:
> export DISTCC_VERBOSE=1

I found the extra output helpful in diagnosing issues.

The following command is necessary any time the list of client names changes. The order is important, but really only matters if you include the master in the worker list. Due to the limited resources on the Beaglebone, I chose not to allow normal building on the master.
> export DISTCC_POTENTIAL_HOSTS='astro dogbert snoopy underdog droopy scooby goofy peabody brian'

We can now call distcc, but instead of calling it directly, we are going to use the distcc-pump tool. Distcc-pump parses the "DISTCC_POTENTIAL_HOSTS" variable and automatically configures and starts the appropriate distcc services.

Most of the websites that show examples for distcc show something like this:
distcc-pump make -j12 CC="distcc"
which works, but when compiling large projects that are written in both C and C++, like Qt, that command only compiles SOME of the code on the cluster. Needless to say, this is bad and the master Beaglebone dies a quick death due to memory loss.

The workaround took me a while to figure out, but is really simple. Because distcc is smart enough to figure out which compiler to use, call this line instead:
> distcc-pump make -j12 CC=distcc CXX=distcc


Now that you have a working compiler, you can play around with the -j12 parameter to get the best results. Many distcc examples claim that this parameter could be very large, but that does not work for compiling a large project like Qt. The main choke point is the amount of RAM and the huge memory requirements for the include server.

Building Qt and Optimizations

Like I alluded to earlier, I did manage to compile Qt on the cluster, but it wasn't "clean". After a half hour of compiling, the master Beaglebone runs out of memory. It's not that big of a deal, because you can just run the distcc-pump command again, but I wanted to see if I could help it out.

To do this, I created 1 Gb of swap space on a micro SD card. This helped, but only extended the build time to an hour before the memory was full and the Beaglebone started spending most of it's time paging memory.

The ultimate solution was to use a master with more memory. I chose a Wandboard i.MX6 paired with a SATA HD, which worked well.

Here are the resultant compile times for various configurations:
Single Beaglebone                        ~19-20 hours
Beaglebone Master + 7 Beaglebone Workers ~5-6 hours
Beaglebone Master + 9 Beaglebone Workers ~5 hours
Wandboard Master + 8 Beaglebones         <4 hours

References


Tuesday, November 11, 2014

Beaglebone Debian Read Only Filesystem

Overview

To save the eMMC and to allow for faster bootup/shutdowns, I wanted to mount the root partition as read-only. I spent many days researching and trying to find out what areas of the filesystem needed to have write permissions. It seemed like I was going in circles. Unionfs, aufs, mount -bind, overlayfs, tmpfs.....so many options and so many modules that didn't exist in the default BBB Debian kernel. I finally got so fed up that I decided to just start hacking away at the fstab.

Details

It turns out that the basic read-only filesystem is fairly easy to create, as everything that needs to be configured is contained in /etc/fstab. We need to change the root mount to read-only and add a couple of temporary file systems to handle logs and such. Let's start with an ordinary fstab created by the eMMC flasher script:
# /etc/fstab: static file system information.
#
# Auto generated by: beaglebone-black-eMMC-flasher.sh
#
UUID=716e1ca7-bc61-4958-8c0d-665e48102cfd / ext4 ro,noatime,errors=remount-ro 0 1
UUID=0DFE-E81B /boot/uboot auto defaults 0 0
debugfs /sys/kernel/debug debugfs defaults 0 0

We could then use the following sed command to add the "ro" tag to the root mount line and save it to a temporary fstab file:
> sudo sed s:ext4\ \ noatime:ext4\ \ ro,noatime: /etc/fstab_ro

Next we need to append some tmpfs declarations to our temporary fstab file:
> sudo nano /etc/fstab_ro

and put the following lines at the end:
tmpfs /tmp tmpfs nodev,nosuid,size=32M 0 0
tmpfs /srv tmpfs nodev,size=512K 0 0
tmpfs /var/log tmpfs defaults,noatime,size=1M 0 0
tmpfs /var/tmp tmpfs defaults,noatime,size=512K 0 0
tmpfs /var/run tmpfs defaults,noatime,size=512K 0 0

Replace the real /etc/fstab with your temporary file:
> sudo cp /etc/fstab /etc/fstab.orig
> sudo mv /etc/fstab_ro /etc/fstab

Reboot and you're done!

You may have to experiment with different size limits, depending on your logging needs, but the sizes above should get you started.

Alternate Method

Systemd does the actually mounting, by parsing the fstab. The order in which the mounts are created is not guaranteed. If you need to create mounts in a particular order you need to create a systemd .mount unit for each mount:
> sudo nano /etc/systemd/system/my.mount


with content similar to the following:
[Unit]
Description=Runtime Directory
Before=local-fs.target

[Mount]
What=/mine
Where=/tmp/myfs
Type=bind
Options=bind

Remount RW

If you need to modify the filesystem, you can remount it rw, for a while, with the following command:
> sudo mount -o remount,rw /

To return to read-only mode, either reboot or run this command:
> sudo mount -o remount,ro /

References

https://groups.google.com/forum/#!topic/beagleboard/9J2r8xn3-Os
http://adis.ca/tag/beaglebone/
http://unix.stackexchange.com/questions/27449/mount-a-filesystem-read-only-and-redirect-writes-to-ram
https://help.ubuntu.com/community/aufsRootFileSystemOnUsbFlash
http://unix.stackexchange.com/questions/81959/how-to-mount-aufs-file-system-on-boot-in-archlinux
http://www.thegeekstuff.com/2013/05/linux-aufs/
https://wiki.debian.org/ReadonlyRoot
https://code.google.com/p/rootaufs/wiki/HowToUse

Monday, March 10, 2014

Qt 5.2.1 Beaglebone Binaries

Overview

So, how did I create these binaries....well I thought it would be fun to see how long it would take the Beaglebone to compile Qt. Here is a brief description of my setup.

I powered the Beaglebone with a 5v power supply and booted a Debian rootfs using TFTP and NFS (a future post will explain how to configure this) so I could utilize the large HD of my Linux host. After compiling and installing Qt, the total root filesystem usage is around 3 Gb. The actual compile took about 21 hours, which includes compiling all examples and plugins.

Configuration

I created a simple shell script to modify the Qt source, with the Beaglebone configuration, and run the Qt configuration script:
#!/bin/sh
# Create beaglebone hard float configuration file
cd qt-everywhere-opensource-src-5.2.1/qtbase/mkspecs/devices/
cp -r linux-beagleboard-g++ linux-beaglebone-g++
sed 's/softfp/hard/' <linux-beagleboard-g++/qmake.conf >linux-beaglebone-g++/qmake.conf
# Run configuration
cd ../../../
./configure -v -opensource -confirm-license -prefix /usr/local/qt-5.2 -no-largefile -no-accessibility -qt-zlib -no-gif -qt-libpng -qt-libjpeg -no-nis -no-cups -device linux-beaglebone-g++


This produced the following summary:
   Configure summary
Build type:    linux-g++ (arm, CPU features:)
Platform notes:
            - Also available for Linux: linux-kcc linux-icc linux-cxx
        
qmake vars .......... styles += mac fusion windows DEFINES += QT_NO_MTDEV QT_CFLAGS_DBUS = -I/usr/include/dbus-1.0 -I/usr/lib/arm-linux-gnueabihf/dbus-1.0/include   QT_LIBS_DBUS = -ldbus-1   QT_CFLAGS_GLIB = -pthread -I/usr/include/glib-2.0 -I/usr/lib/arm-linux-gnueabihf/glib-2.0/include   QT_LIBS_GLIB = -pthread -lgthread-2.0 -lrt -lglib-2.0   QT_CFLAGS_PULSEAUDIO = -D_REENTRANT -I/usr/include/glib-2.0 -I/usr/lib/arm-linux-gnueabihf/glib-2.0/include   QT_LIBS_PULSEAUDIO = -lpulse-mainloop-glib -lpulse -lglib-2.0   DEFINES += QT_NO_LIBUDEV QMAKE_CFLAGS_XCB =   QMAKE_LIBS_XCB = -lxcb   QMAKE_CFLAGS_DIRECTFB = -D_REENTRANT -I/usr/include/directfb   QMAKE_LIBS_DIRECTFB = -ldirectfb -lfusion -ldirect -lpthread   sql-drivers =  sql-plugins =  sqlite qmake switches ......... 
Build options:
  Configuration .......... alsa audio-backend c++11 clock-gettime clock-monotonic compile_examples concurrent dbus directfb evdev eventfd full-config getaddrinfo getifaddrs glib iconv inotify ipv6ifname large-config linuxfb medium-config minimal-config mremap neon no-gif no-harfbuzz opengl openssl pcre png posix_fallocate precompile_header pulseaudio qpa qpa reduce_exports reduce_relocations release rpath shared small-config system-freetype xcb xcb-qt xkbcommon-qt xlib zlib 
  Build parts ............ libs tools examples
  Mode ................... release
  Using C++11 ............ yes
  Using PCH .............. yes
  Target compiler supports:
    iWMMXt/Neon .......... no/yes
Qt modules and options:
  Qt D-Bus ............... yes (loading dbus-1 at runtime)
  Qt Concurrent .......... yes
  Qt GUI ................. yes
  Qt Widgets ............. yes
  JavaScriptCore JIT ..... yes (To be decided by JavaScriptCore)
  QML debugging .......... yes
  Use system proxies ..... no
Support enabled for:
  Accessibility .......... no
  ALSA ................... yes
  CUPS ................... no
  FontConfig ............. no
  FreeType ............... system
  Iconv .................. yes
  ICU .................... no
  Image formats: 
    GIF .................. no
    JPEG ................. yes (plugin, using bundled copy)
    PNG .................. yes (in QtGui, using bundled copy)
  Glib ................... yes
  GTK theme .............. no
  Large File ............. no
  mtdev .................. no
  Networking: 
    getaddrinfo .......... yes
    getifaddrs ........... yes
    IPv6 ifname .......... yes
    OpenSSL .............. yes (loading libraries at run-time)
  NIS .................... no
  OpenGL ................. desktop
  OpenVG ................. no
  PCRE ................... yes (bundled copy)
  pkg-config ............. yes 
  PulseAudio ............. yes
  QPA backends: 
    DirectFB ............. yes
    EGLFS ................ no
    KMS .................. no
    LinuxFB .............. yes
    XCB .................. yes (bundled copy)
      MIT-SHM ............ yes
      Xcb-Xlib ........... no
      Xcursor ............ yes (loaded at runtime)
      Xfixes ............. yes (loaded at runtime)
      Xi ................. yes (loaded at runtime)
      Xi2 ................ no
      Xinerama ........... yes (loaded at runtime)
      Xrandr ............. yes (loaded at runtime)
      Xrender ............ no
      XKB ................ yes
      XShape ............. yes
      XSync .............. yes
      XVideo ............. yes
  Session management ..... yes
  SQL drivers: 
    DB2 .................. no
    InterBase ............ no
    MySQL ................ no
    OCI .................. no
    ODBC ................. no
    PostgreSQL ........... no
    SQLite 2 ............. no
    SQLite ............... yes (plugin, using bundled copy)
    TDS .................. no
  udev ................... no
  xkbcommon .............. yes (bundled copy)
  zlib ................... yes (bundled copy)
NOTE: libxkbcommon 0.2.0 (or higher) not found on the system, will use 
the bundled version from 3rd party directory.
NOTE: Qt is using double for qreal on this system. This is binary incompatible against Qt 5.1.
Configure with '-qreal float' to create a build that is binary compatible with 5.1.

If you've tried cross compiling Qt, from my other posts, you will notice a lot more modules are enabled in this build.

I've tested a few examples and they all work, but I have not tested everything (haven't been able to test touch screen stuff yet). The examples default to using X11, if you want to use the linuxfb, add '-platform linuxfb' to the command line options. For example:
> analogclock -platform linuxfb

Here are two versions of binaries, one that includes examples (78 Mb) and one that does not (36 Mb).

MD5SUM:
9395fc70f576e58b68df7d732a002abb  qt-5.2-no-examples.tgz
f698f038166c4b2f65cec40056e23db2  qt-5.2.tgz

Extract to /usr/local, as the tarball contains the qt-5.2 folder in it.

If you want to try your hand at compiling applications on the Beaglebone, these packages have a native qmake included. Don't forget to add /usr/local/qt-5.2/bin to your path.

Have fun!

Tuesday, March 4, 2014

Why Qt Development was stalled....

I finally finished my digital I/O cape! It only took about two and a half hours to hand solder all of the components. It is fully tested and ready to go.

It has an isolated DC to DC converter, 16 optically isolated digital inputs and 16 optically isolated digital outputs, a 4 wire RS-422 port, and an optically isolated 2 wire RS-485 port.


I have released the Eagle 6.5 project files, for my older v1.0 board (v2.0 is in the photo), on GitHub: https://github.com/compeoree/bb-dio-cape.

Now back to Qt 5.....

Sunday, April 28, 2013

ArchLinux on BeagleBone and Linux 3.8

I've discovered the joys of embedded programming with the new Linux kernel 3.8. It is bleeding edge and not for the faint of heart. The way that I/O works has been totally changed, so anything that relied on the /sys/kernel/debug/omap_mux/ folder is broken.

This has to do with switching over to Device Tree Overlays for processor configurations. The README.md file at https://github.com/jadonk/validation-scripts/tree/master/test-capemgr has a good explanation, but that doesn't make it any easier to get it up and running.

I've cloned the validation-scripts repository from https://github.com/jadonk/validation-scripts.git. I tried to run do_pinctrl_test.sh from test-capemgr folder, but it needs dtc. No problem, right, we'll just install it....wrong! The current version of dtc in ALARM is not patched to support the -@ option (see https://patchwork.kernel.org/patch/1934471/), so you get a "dtc: invalid option -- '@'" error message.

I'm not as hardcore as the guys at http://hipstercircuits.com/adding-beaglebone-cape-support-to-a-kernel-with-device-tree-in-ubuntu/ so I am calling it a night. I will look into how to get a patched version of dtc, but if it involves too much, I can see myself jumping ship and reverting to an older kernel.

FYI: Here are a couple of issues that I ran into, when trying to install ArchLinux, and how to fix them:

I followed the instructions at http://archlinuxarm.org/platforms/armv7/beaglebone for configuring and setting up the SD card. When I followed the links provided though, I ran into 2 issues:

  1. I could get a u-boot command prompt, but it could not load the kernel image from the SD card. This was solved by copying /boot/uImage to the DOS partition.
  2. After looking for upgrades ('pacman -Syu'), the kernel update gave a warning that my u-boot was probably out of date. After a reboot, sure enough the "image is wrong type" error message appeared in u-boot. I corrected this by downloading and installing http://os.archlinuxarm.org/os/omap/BeagleBone-bootloader.tar.gz